This post contains affiliate links. As an Amazon Affiliate, I earn from qualifying purchases. I may receive a small commission – no extra cost to you – when you make a purchase through these links.
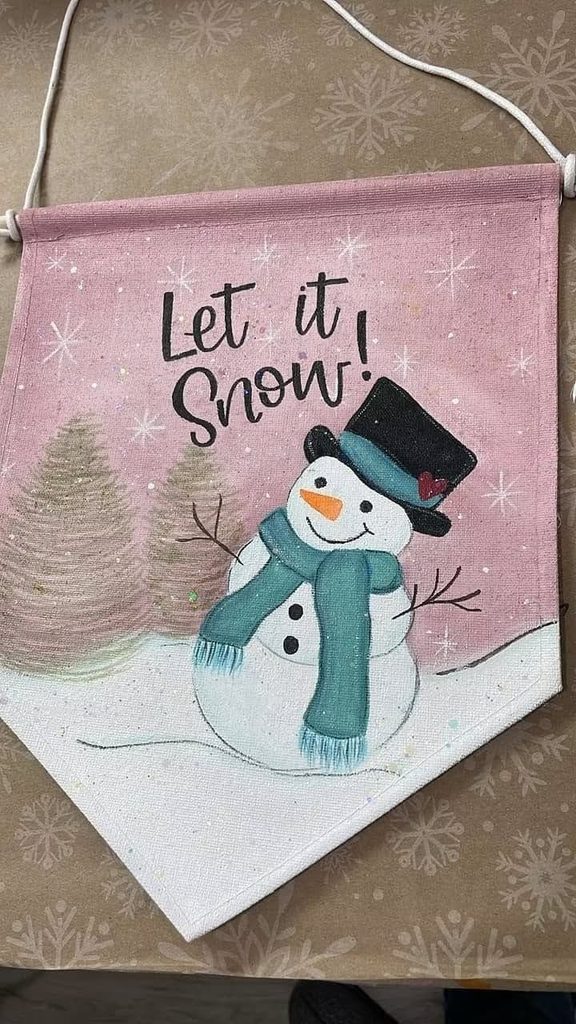
If you want a quick winter craft that doesn’t scream Christmas, this snowman canvas banner is it. It’s small, can be made for just a few dollars, and it can stay up all January long.
In this step-by-step tutorial, I’ll walk you through the whole thing: transferring the template, painting a soft watercolor-style background, shading a sweet little snowman, and a hand-lettered phrase, “Let It Snow,” on top.
Supplies You’ll Need for a Snowman Canvas Banner
You probably have most of these already. Swap in what you have — this project is very forgiving.
➜ You can get most of the supplies below in my Amazon storefront!
Surface and template
- Small canvas banner: I found mine in the Hobby Lobby holiday section for $1.99 (about $1 on their 40% off sale). A Dollar Tree canvas board, wood round, or door hanger works too.
- “Let It Snow” lettering template: I used a lettering template that you can find inside the Template Library.
- Graphite paper or a gray watercolor pencil for transferring
Paint
- DecoArt Blush Pink, mixed with white (background)
- White: Waverly Chalk Paint in Snow White, DecoArt, or Apple Barrel
- FolkArt Dutch Aqua (shading and scarf)
- DecoArt Deep Midnight Blue (navy shading)
- Black, a light brown, a light green, and a muted red
- Optional: a glitter paint for shimmer (mine is called Snowfall) or any holographic or iridescent glitter
Brushes and markers
- Small flat brush, angled brush, and a thin liner brush (I used a #2)
- Tombow Dual Brush Markers in blue and orange
- Black Faber-Castell marker or black paint pen
- A brush pen for lettering
Extras
- Cup of water, paper towels, and baby wipes
- Spray sealer
- Skinny ribbon, baker’s twine, or yarn for hanging
- Optional: gesso, acrylic medium, a toothpick for tiny details
Step #1: Transfer the Snowman Template
You can transfer with graphite paper (shiny side down), or try my new favorite trick: since these banners are thin, lay yours right on top of the printed template and trace with a gray watercolor pencil. Gray won’t muddy your colors, and it blends away once you paint.
Trace only the big shapes — the background edge, snowman, hat, and scarf. Skip the face, buttons, and lettering for now so you’re not painting around them. Traceable lettering templates like the one I’m using mean you never start from a blank canvas.
PRO TIP: Trace the hat darker. It’s hard to find once the background goes on.

Step #2: Paint the Snowman White
Use a small brush to fill in the snowman and the snowy ground. Canvas is textured, so it takes a little more paint than wood. Chalk paint covers in fewer coats; cheaper craft paint works, but you may use twice as much.
Step #3: Create a Watercolor-Style Background
Mix Blush Pink with white and dip your brush in a little water. The paint spreads faster without losing coverage on the white canvas.
Canvas dries slower than wood, so you have time to blend:
- Too dark? Brush a little watered-down white into the center.
- Dab straight pink along the outer edges.
- Feather it inward with light pressure for a soft, darker border.

Step #4: Shade Your Snowman
Thin Dutch Aqua with water, run it along the snowman’s edges, then pull it into the white with a clean, damp brush. This gives him definition without an outline. Start with less than you think — if he turns too blue, add white to the middle.
Add a soft shadow line under him on the ground. A little unevenness looks like wind blowing the top layer of snow.
Step #5: Paint the Hat, Scarf, and Face
Hat and scarf
Paint the hat black (a black marker works too). Paint the scarf Dutch Aqua, then shade its edges with Deep Midnight Blue. On canvas, your brush shading can do the job outlines usually do.
Draw the scarf fringe with a blue Tombow Dual Brush Marker. Tombows are water-based, so keep them away from wet paint.
Eyes, arms, and nose
- Use the Faber-Castell marker to outline the hat and dot the eyes and buttons. Press lightly — hard pressure makes bumpy lines on canvas.
- Paint stick arms in brown with a liner brush. Start thin — you can always thicken them.
- Draw a jagged carrot nose with the orange Tombow. He’s a snowman — he doesn’t need to be perfect!

Step #6: Add Soft Trees and Snowflakes
Sketch the trees in light green with a zigzag that gets wider as you go down. Keep them faint so they don’t compete with your snowman — and so your banner works all winter, not just at Christmas. Struggling with a shape? Flip your banner upside down for a fresh look.
Add a tiny muted-red heart, then paint snowflakes with watered-down white and your thinnest liner brush. Thick snowflakes look heavy, so trim an old liner brush if you need to. Dot extra snow with the end of your brush if you want to fill it out even more.
Step #7: Hand Letter “Let It Snow”
Let the canvas dry completely, then transfer your lettering from the template. (I tested a light box — it doesn’t shine through canvas.)
Letter with a brush pen using the same idea I teach for lettering on signs: on a bumpy road, ease off the gas. Lighter pressure glides over the canvas texture. Start with little, then build thickness. Brush pen tips can wear on canvas, so use an older one.
PRO TIP: To camouflage an awkward gap, add a snowflake or polka dot — your eye skips right over it.

Step #8: Finish, Seal, and Hang
Dab glitter paint over the snow for shimmer, working around marker lines so they don’t smear. If it does smudge or smear, you can always use a baby wipe to clean it right up!
I added a light black outline to define the snowman. Seal with spray sealer, then tie on skinny ribbon, baker’s twine, or yarn.
Snowman Canvas Banner FAQ
Can I paint this design on a wood door hanger?
Yes. It works on a door hanger or wood round. Wood dries faster, so blending is harder, and you’ll need more coats.
Do I need gesso on a canvas banner?
No. Gesso primes canvas, but I didn’t see a difference on these small banners.
Can I use a Sharpie on canvas?
On dry paint, usually yes. Alcohol-based markers can bleed into watered-down paint, so I use a Faber-Castell marker.
Where can I buy small canvas banners?
I found mine in the Hobby Lobby holiday section for about $1.99. If yours is sold out, a Dollar Tree canvas board works with the same template.
Letter Along With Us in the Happy Lettering Club
Want more projects like this? The Happy Lettering Club, my hand lettering membership for beginners and growing letterers, has tons of them!
Each month you get new seasonal projects, technique classes, guest artists, and a friendly Facebook group cheering you on. Can’t make it live? Every class has a replay.
Learn more about joining here!
It’s $35/month, and you can cancel anytime. I can’t wait to see what you create!